Pi Coding Agent Tutorial 2026: Install, Set Up, and Use the Open-Source AI Coding Agent
Learn how to install, authenticate, and set up Pi Coding Agent, an open-source terminal AI coding agent for developers. This beginner-friendly 2026 guide covers npm installation, providers, sessions, settings, and first-use workflow.
What Is Pi Coding Agent?
Pi Coding Agent is an open-source, terminal-based AI coding agent. Instead of working only as an editor autocomplete tool, Pi runs inside your project directory and helps with real development tasks from the command line.
You can ask Pi to inspect a repository, read files, explain code, run shell commands, edit files, review changes, and help you continue work across saved sessions.
By default, Pi gives the model several built-in tools:
read— read fileswrite— create or overwrite filesedit— patch filesbash— run shell commands
Additional read-only tools such as grep, find, and ls are available through tool options.
Pi fits into the broader category of AI coding agents, but its main focus is a lightweight, terminal-first workflow. You launch it in a project directory, connect it to a supported model provider, and work with your codebase through a command-line interface.
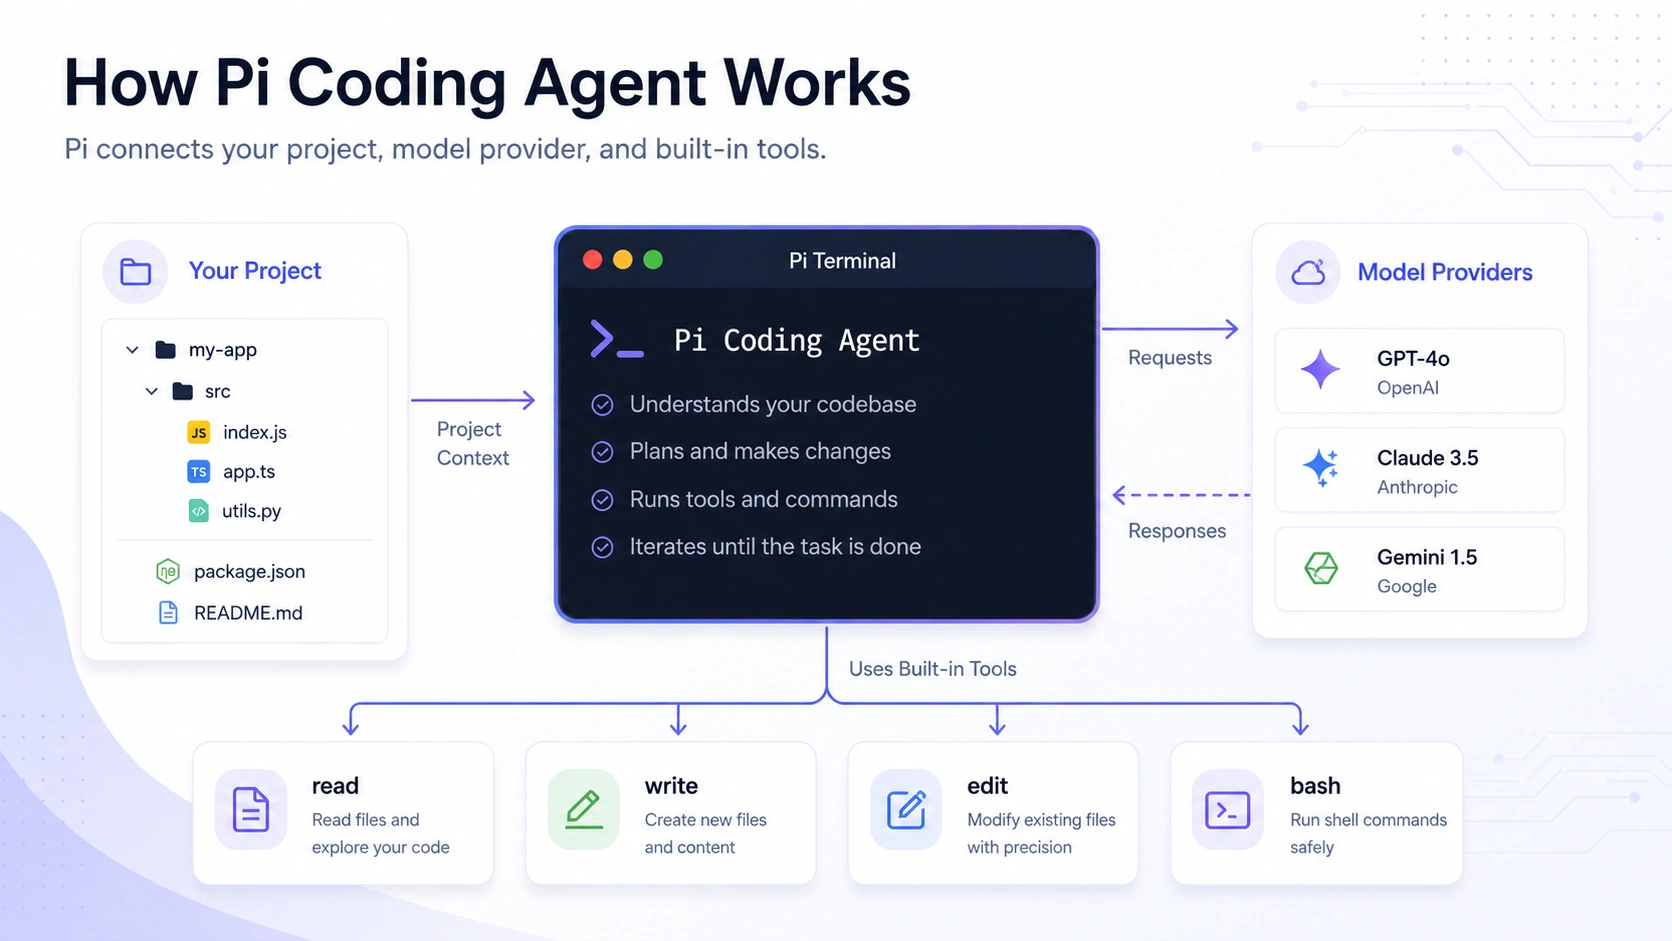
Pi runs in your project directory, connects to a model provider, and uses tools to read files, edit code, and run commands.
What Does “Set Up Pi” Mean?
In this guide, “set up Pi” means more than installing the command-line package.
A complete beginner setup includes:
Installing the Pi CLI.
Starting Pi inside your project directory.
Authenticating with a supported subscription or API-key provider.
Choosing or switching models.
Adding project instructions with
AGENTS.md.Understanding how Pi sessions are saved.
Running your first safe coding workflow.
This tutorial walks through each step in order.
Who Should Use Pi Coding Agent?
Pi is a good fit if you want a terminal-first AI coding agent that can work directly inside your project.
It is especially useful for developers who want:
An open-source AI coding agent
A CLI-based workflow
Support for multiple AI providers
Project-specific instructions through
AGENTS.mdSession history and branching
A tool that can read files, edit code, and run commands
Pi may not be ideal if you only want editor autocomplete, a visual AI IDE, or a no-code coding assistant.
Pi vs Claude Code: Which One Should You Choose?
Pi Coding Agent and Claude Code are both terminal-based AI coding agents, but they are not exactly the same.
Use Pi Coding Agent if you want an open-source, lightweight, provider-flexible coding agent that can run inside your project directory and work with different model providers.
Use Claude Code if you mainly want Anthropic’s official Claude-first coding agent and prefer to stay within the Claude ecosystem.
| Choose Pi Coding Agent if you want... | Choose Claude Code if you want... |
| An open-source terminal AI coding agent | Anthropic’s official coding agent |
| Support for multiple model providers | A Claude-first workflow |
| More control over settings and project instructions | A more opinionated official tool |
| Sessions, branching, and compaction in the CLI workflow | Tight integration with Claude models |
Prerequisites
Before installing Pi Coding Agent, make sure you have:
Node.js installed
npm installed
A terminal environment
A project folder you want Pi to work on
A supported AI provider subscription or API key
You can check Node.js and npm with:
node --version
npm --version
If both commands return version numbers, you can continue.
Step 1: Install Pi Coding Agent
Pi is distributed as an npm package. Install it globally with:
npm install -g --ignore-scripts @earendil-works/pi-coding-agentThe --ignore-scripts flag disables dependency lifecycle scripts during installation. Pi does not require install scripts for normal npm installs.
After installation, check that Pi is available:
pi --versionIf the terminal returns a version number, the installation was successful.
Step 2: Start Pi in Your Project Directory
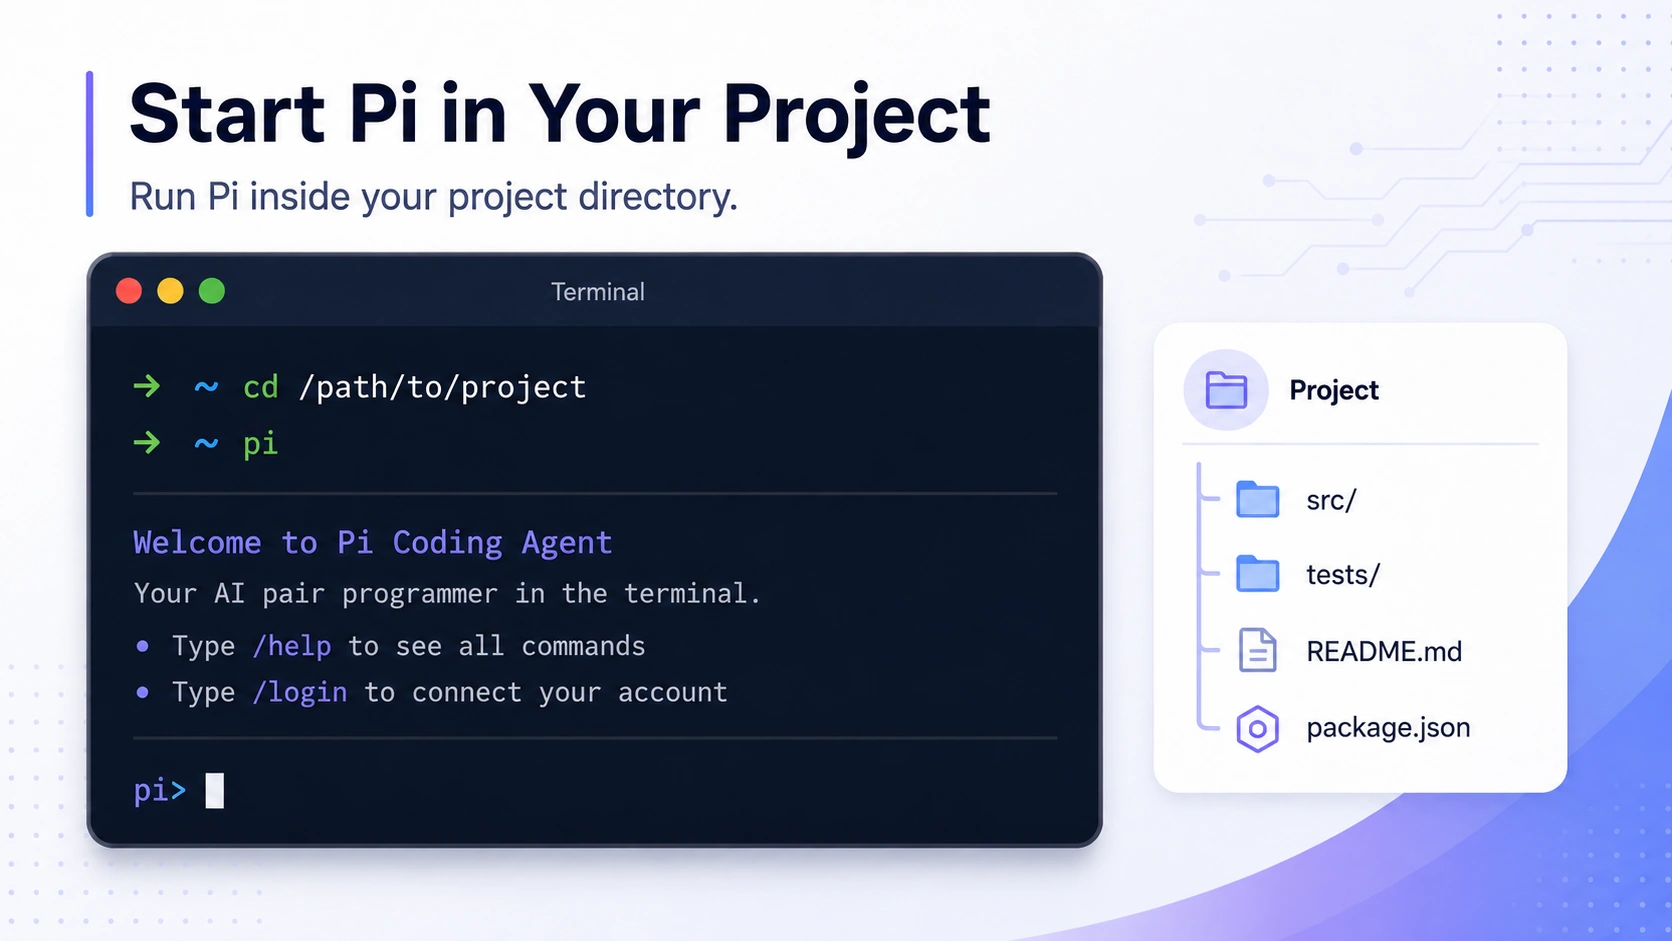
Pi works from the directory where you launch it. Move into the project you want Pi to help with:
cd /path/to/projectThen start Pi:
piThis opens Pi in interactive mode.
Step 3: Authenticate Pi
Pi supports two main authentication paths:
Subscription login
API key setup
Option 1: Subscription Login
In interactive mode, run:
/loginThen select a supported provider.
Pi supports subscription-based authentication for providers such as:
ChatGPT Plus/Pro through Codex
Claude Pro/Max
GitHub Copilot
This is often the easiest path for beginners because authentication starts inside Pi.
Option 2: API Key Setup
You can also use environment variables.
For OpenAI:
export OPENAI_API_KEY=sk-...
pi
For Anthropic:
export ANTHROPIC_API_KEY=sk-ant-...
pi
Pi also supports many other API-key providers, including Google Gemini, DeepSeek, Mistral, Groq, OpenRouter, xAI, Fireworks, Together AI, Hugging Face, and more.
You can also use /login and select an API-key provider to store credentials in Pi’s auth file.
⚠️ Security: Never share API keys in screenshots, logs, or public documents.
Pi supports both subscription login and API-key authentication, depending on the provider you choose.
Step 4: Run Your First Pi Session
After installation and authentication, start with a simple repository-level request:
Summarize this repository and explain the main folders.Then ask Pi to identify common project commands:
Find the development, build, lint, and test commands for this project.If you want Pi to run a command and send the output to the model, prefix the command with !:
!npm testIf you want to run a command without sending the output into the model context, use !!:
!!npm testThis is useful when you want to run something locally but avoid adding noisy output to the conversation.
Step 5: Reference Files in Your Prompt
Pi supports file references.
In interactive mode, type @:
Then fuzzy-search project files from the editor.
You can also pass files from the command line:
pi @README.md "Summarize this file"Or ask Pi to review multiple files together:
pi @src/app.ts @src/app.test.ts "Review these files together"File references help Pi focus on the right context instead of scanning unrelated parts of the project.
Step 6: Add Project Instructions with AGENTS.md
One of the most useful setup steps is adding project-specific instructions.
Create an AGENTS.md file in your project root:
# Project Instructions

- Run `npm run check` after code changes.
- Do not run production migrations locally.
- Keep changes small and reviewable.
- Explain risky changes before editing files.
Pi loads context files at startup from:
~/.pi/agent/AGENTS.mdfor global instructionsAGENTS.mdorCLAUDE.mdin parent directoriesAGENTS.mdorCLAUDE.mdin the current directory
After changing context files, restart Pi or run:
/reloadThis reloads settings, context files, extensions, skills, prompts, and themes.
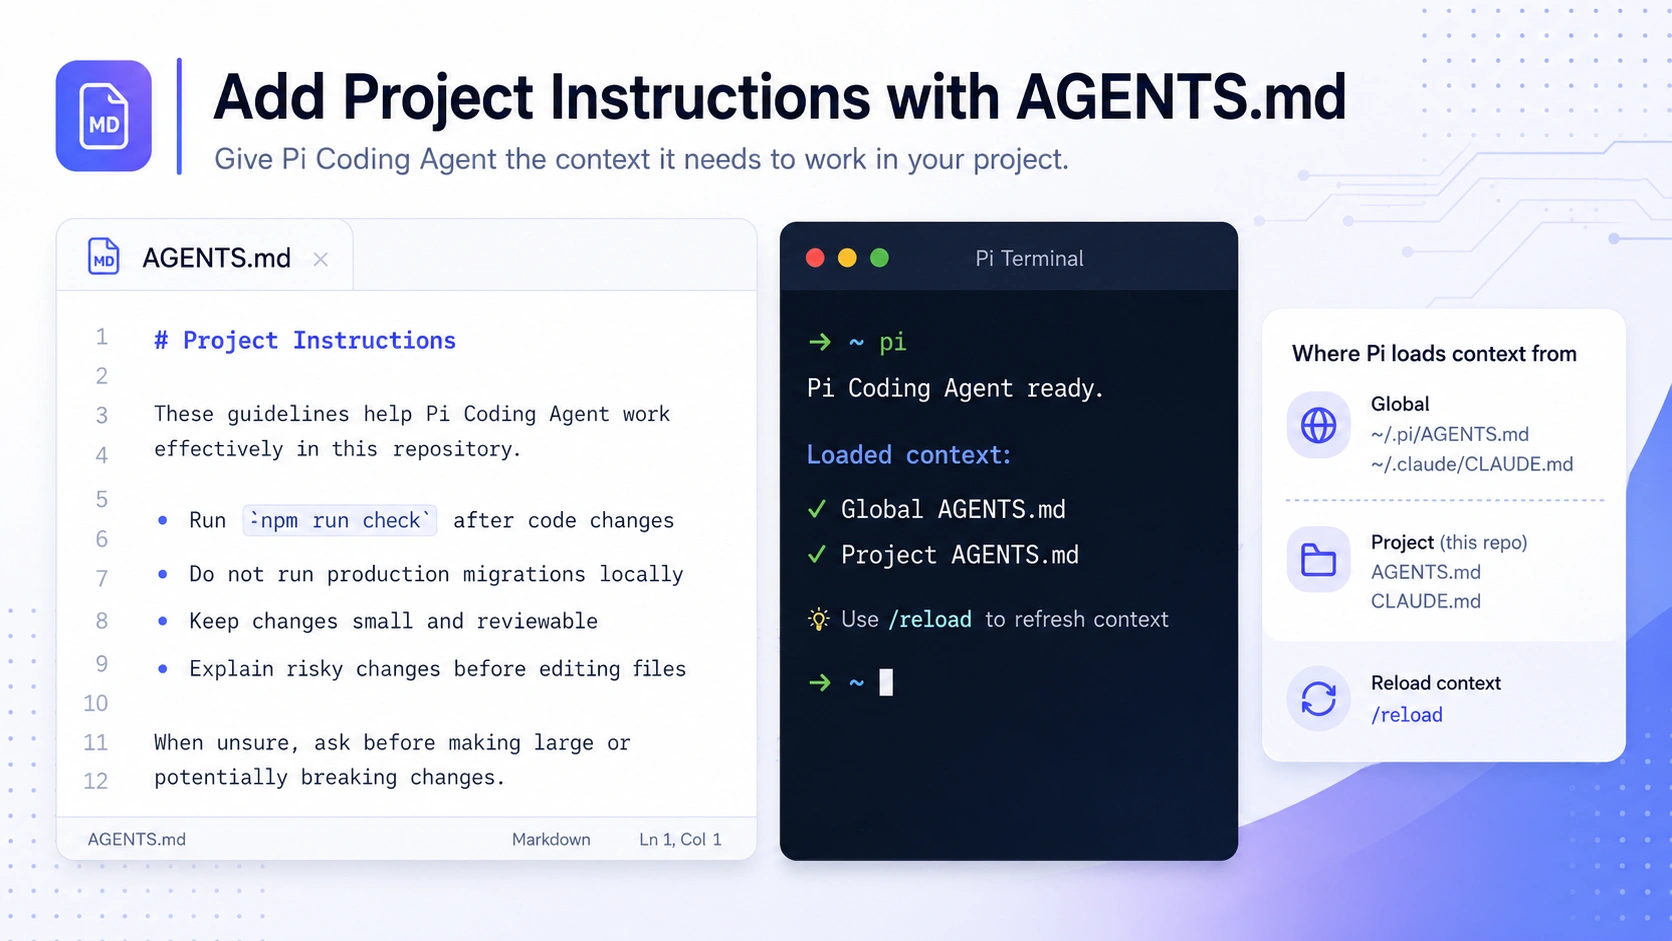
Use AGENTS.md to give Pi project-specific rules, commands, and safety instructions.
Step 7: Choose or Switch Models
Inside Pi, you can switch models with:
/modelYou can also start Pi with a specific provider and model:
pi --provider openai --model gpt-4oOr use a provider-prefixed model:
pi --model openai/gpt-4oPi also supports thinking levels such as:
offminimallowmediumhighxhigh
For example:
pi --model sonnet:highA simple rule for beginners:
Use lower thinking levels for quick questions.
Use higher thinking levels for debugging, architecture review, refactoring, and multi-step reasoning.
Step 8: Manage Sessions
Pi saves conversations as sessions so you can continue work later.
By default, sessions are saved under:
~/.pi/agent/sessions/Useful session commands include:
pi -cContinue the most recent session.
pi -rBrowse and select a previous session.
pi --no-sessionStart an ephemeral session that does not save to disk.
pi --name "release audit"Start Pi with a named session.
Inside Pi, common session commands include:
/resume
/new
/name
/session
/tree
/fork
/clone
/compact
These commands help you resume, branch, duplicate, or summarize work.
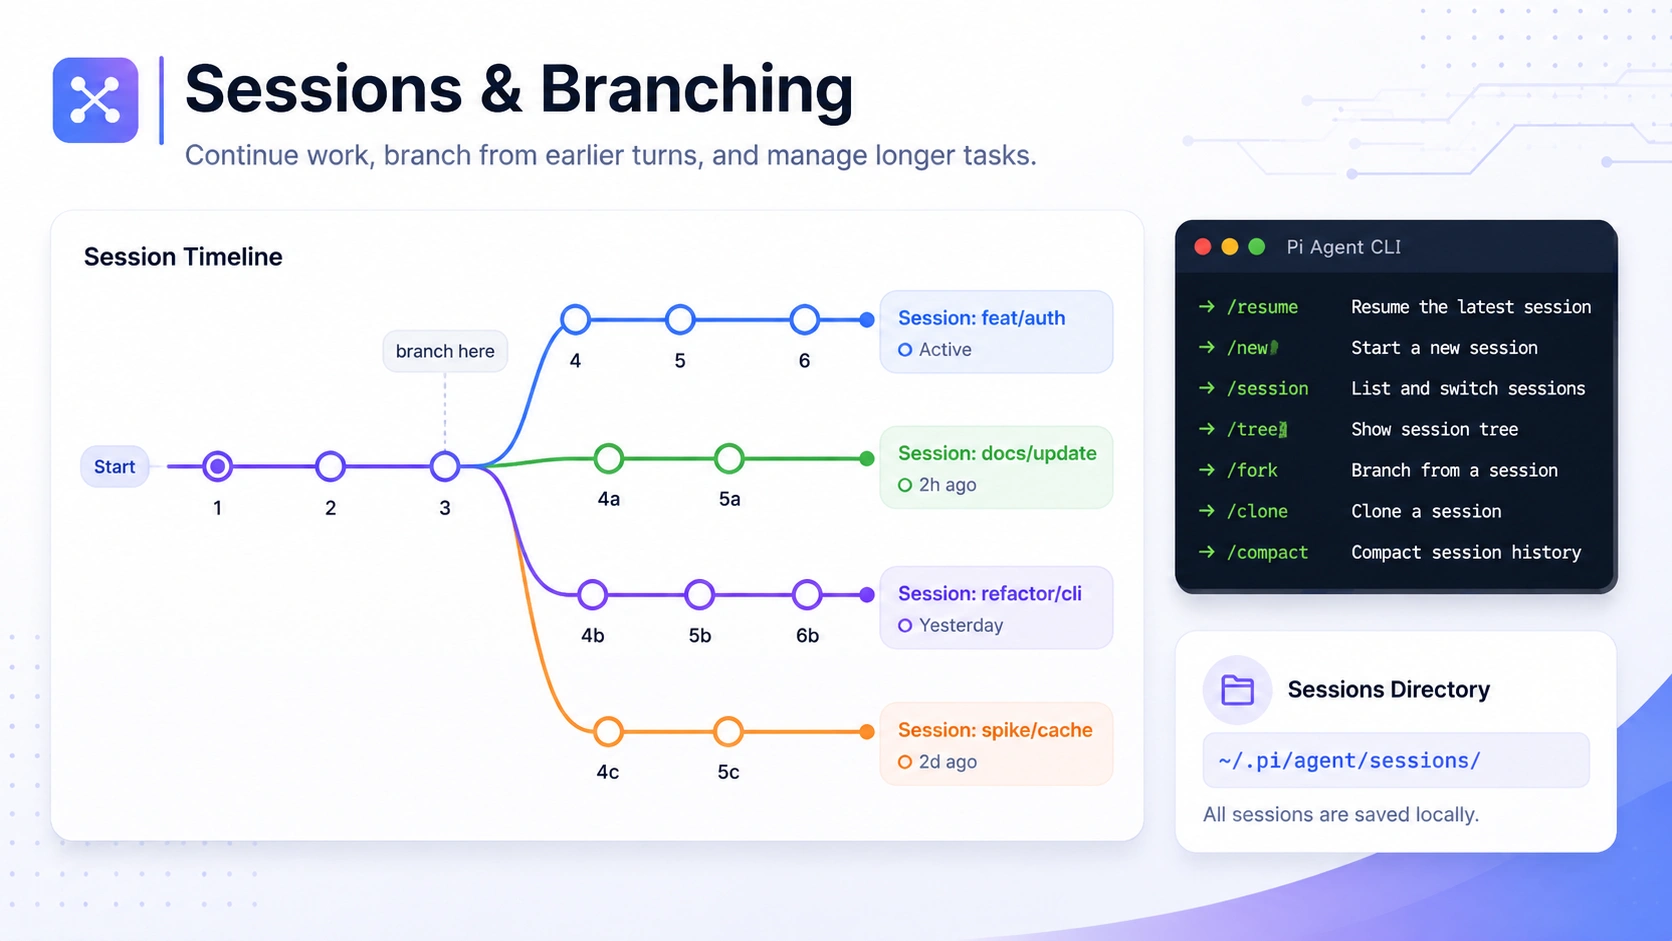
Pi sessions let you continue previous work, branch from earlier turns, and manage longer coding tasks.
Step 9: Configure Pi Settings
Pi uses JSON settings files.
Global settings are stored at:
~/.pi/agent/settings.jsonProject settings are stored at:
.pi/settings.jsonProject settings override global settings.
A simple settings example:
{
  "defaultProvider": "anthropic",
  "defaultModel": "claude-sonnet-4",
  "defaultThinkingLevel": "medium",
  "theme": "dark",
  "compaction": {
    "enabled": true,
    "reserveTokens": 16384,
    "keepRecentTokens": 20000
  }
}
You can also open an interactive settings UI inside Pi with /settings to configure thinking level, theme, message delivery, and transport.
Important settings include:
default provider
default model
default thinking level
theme
retry behavior
session directory
compaction settings
enabled models for cycling
Step 10: Understand Compaction
Long AI coding sessions can exceed a model’s context window. Pi uses compaction to summarize older conversation history while preserving recent work.
Compaction can happen automatically when the context gets too large. You can also trigger it manually:
/compactYou can add custom instructions:
/compact Focus on changed files, unresolved bugs, and next steps.For beginners, the key idea is simple: compaction helps Pi continue long coding sessions without replaying every previous message in full.
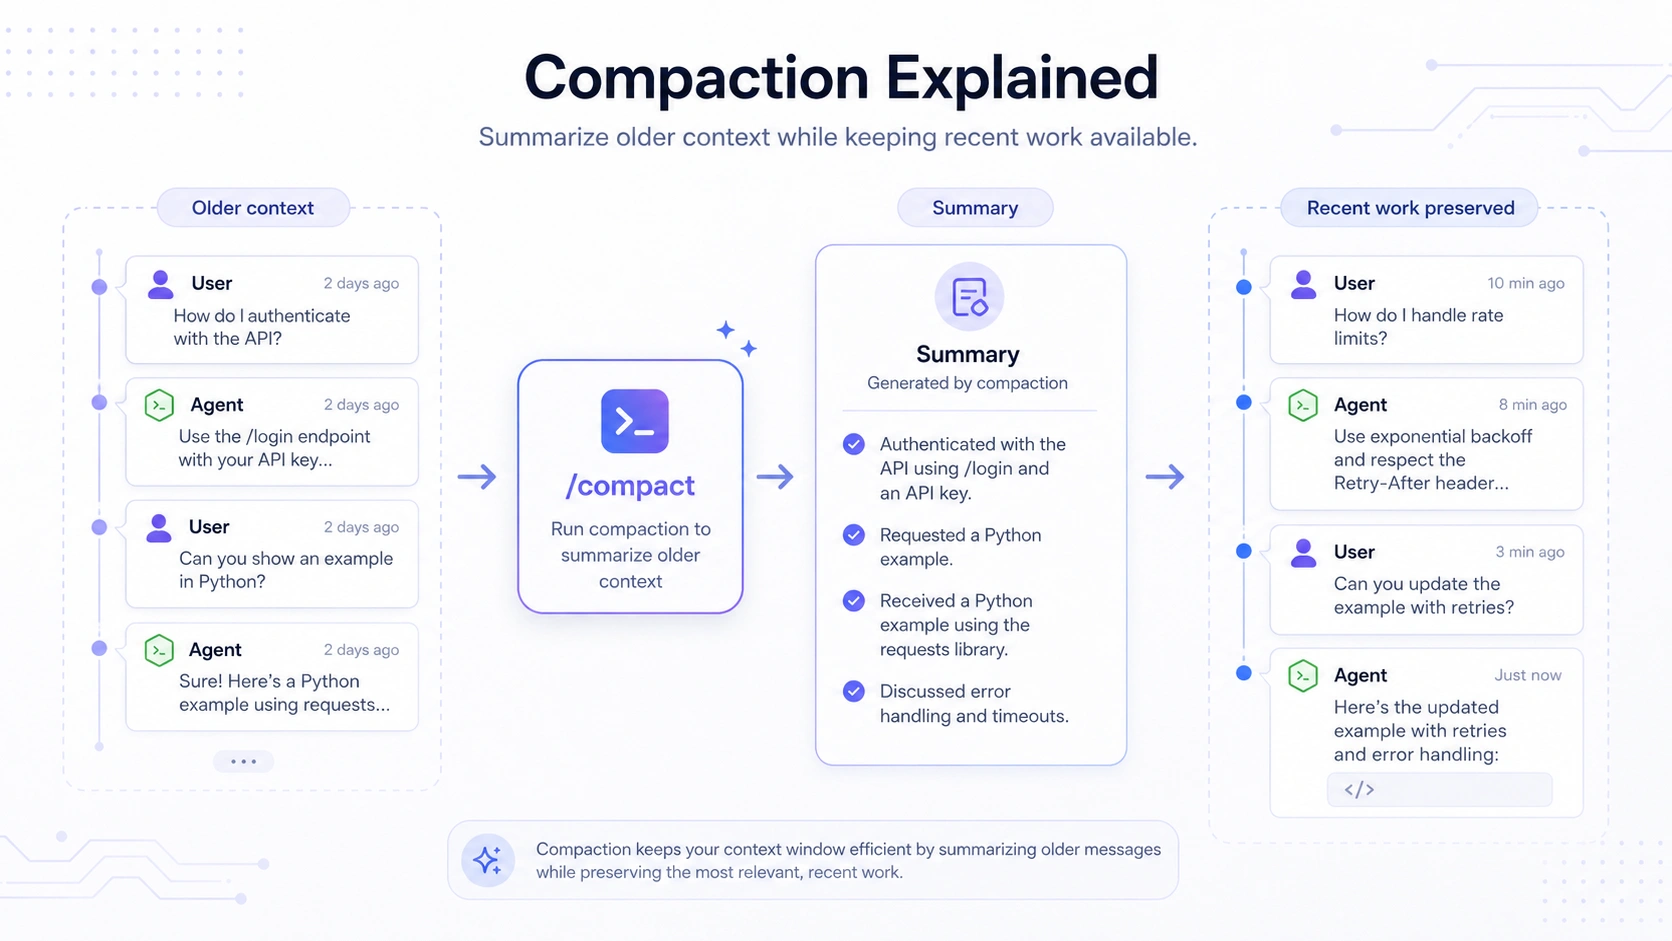
Compaction summarizes older conversation history so Pi can keep working during long sessions.
Beginner Workflow: A Safe Way to Use Pi on a New Project
If you are using Pi for the first time, do not start by asking it to edit a large part of your codebase.
Use this workflow instead.
1. Start Pi in your project
cd /path/to/project
pi
2. Ask Pi to understand the repository
Summarize this repository and explain the main folders, languages, and build tools.3. Ask Pi to find the project commands
Find the commands for development, testing, linting, and building. Do not edit files.4. Ask for a plan before changes
I want to fix the failing tests. First explain the likely cause and propose a small plan. Do not edit files yet.5. Approve a small edit
Make the smallest safe fix for the failing test and explain what you changed.6. Run relevant checks
Run the relevant test command for the files you changed and summarize the result.This approach keeps you in control and makes the AI-assisted workflow easier to review.
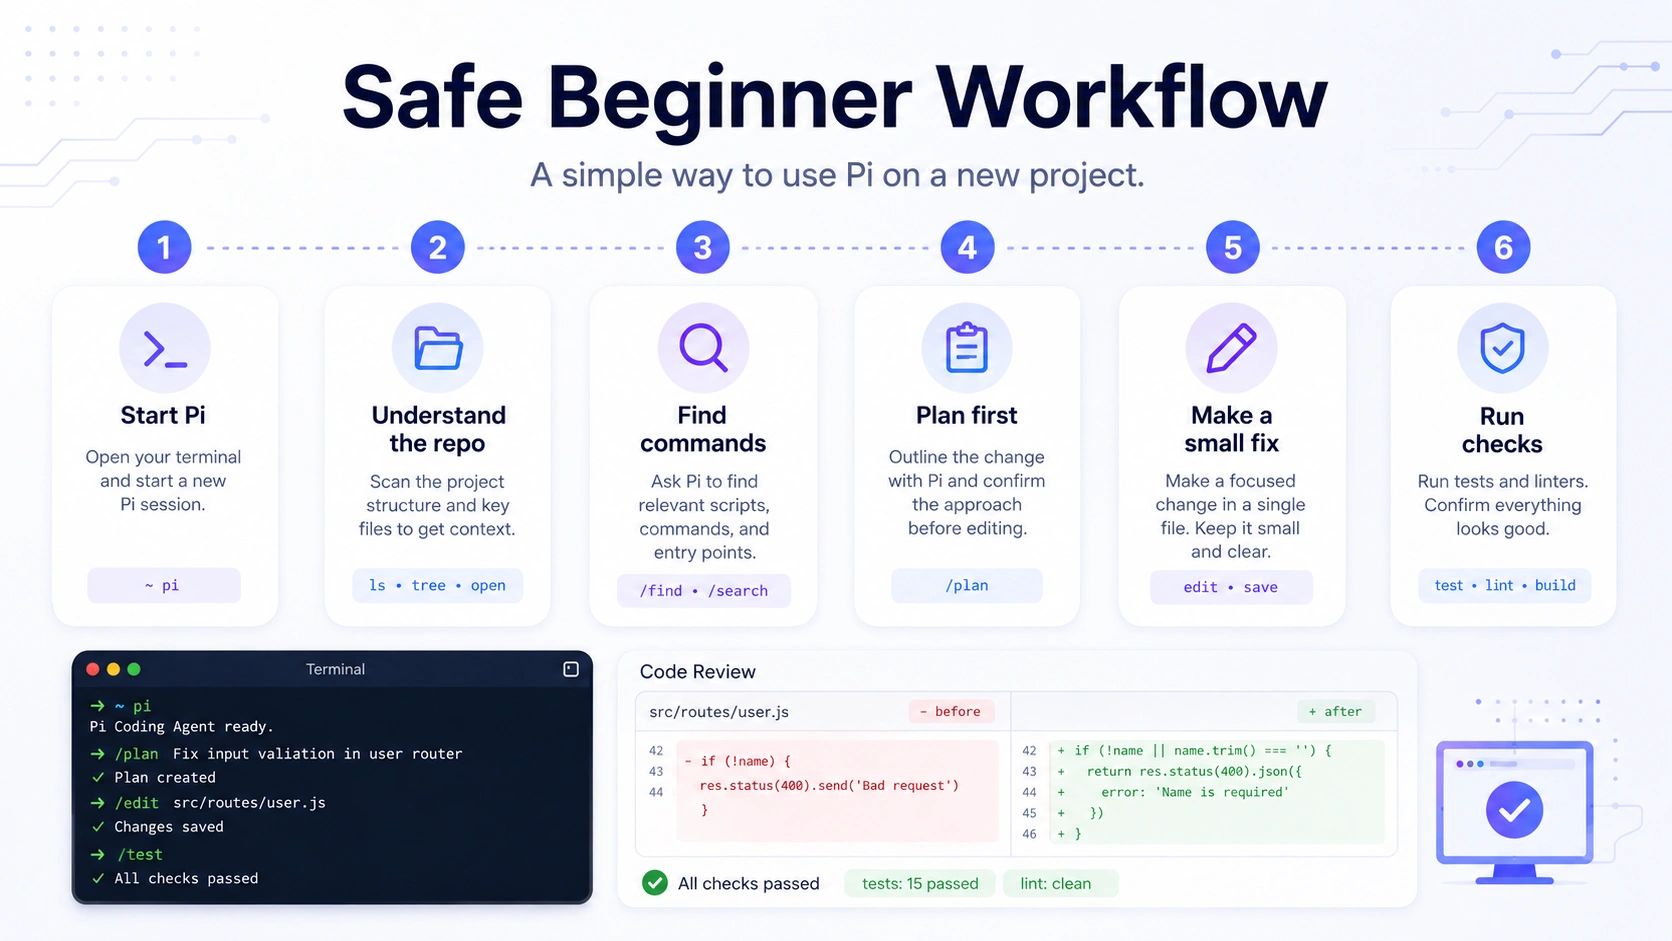
A safe beginner workflow: understand the project first, plan changes, make small edits, and run checks.
Best Practices for Using Pi Coding Agent
Start with Read-Only Requests
Before asking Pi to modify files, ask it to inspect and explain the project.
Good examples:
Explain how authentication works in this project.Find where the API client is defined. Do not edit files.Review this module and identify possible risks before changing anything.Use Git Before Making Changes
Because Pi can edit files and run commands, use a checkpoint workflow.
For example:
git status
git add .
git commit -m "Checkpoint before using Pi"
This makes it easier to review or roll back changes.
Keep Tasks Small
Avoid broad prompts like:
Refactor the whole app.Use focused prompts instead:
Refactor the user settings component to reduce duplication. Keep behavior unchanged.Small tasks are easier to test, review, and revert.
Add Clear Project Instructions
A good AGENTS.md file can improve Pi’s usefulness.
Include:
test commands
lint commands
formatting rules
folders to avoid
deployment warnings
project-specific conventions
Ask Pi to Explain Risky Changes
For important files, ask Pi to explain before editing:
This touches authentication. Explain the risks and wait before editing files.This is especially useful for migrations, security-sensitive logic, payment flows, and production configuration.
Troubleshooting
pi: command not found
If the terminal cannot find the pi command, the global npm binary path may not be in your shell PATH.
Check your global npm binary location:
npm bin -gThen make sure that directory is included in your PATH.
You can also reinstall Pi:
npm install -g --ignore-scripts @earendil-works/pi-coding-agentAuthentication Is Not Working
Run:
/loginThen select the correct provider.
If you use an API key, confirm the environment variable is set:
echo $OPENAI_API_KEY
echo $ANTHROPIC_API_KEY
Do not share API keys in screenshots, logs, GitHub issues, or public documents.
Pi Is Using the Wrong Model
Use:
/modelOr start Pi with a specific provider and model:
pi --provider openai --model gpt-4oYou can also configure defaults in settings.json.
Pi Has Too Much Context
Use:
/compactThis summarizes older context and leaves more room for the current task.
I Do Not Want to Save the Session
Start Pi with:
pi --no-sessionThis creates an ephemeral session.
I Changed AGENTS.md, but Pi Did Not Pick It Up
Restart Pi or run:
/reloadThis reloads project instructions and other resources.
FAQ
What is Pi Coding Agent?
Pi Coding Agent is an open-source terminal AI coding agent. It runs inside your project directory and can help read files, edit code, run shell commands, and manage coding sessions.
How do I install Pi Coding Agent?
Install it globally with npm:
npm install -g --ignore-scripts @earendil-works/pi-coding-agentThen start it inside your project:
cd /path/to/project
pi
Does Pi Coding Agent require an API key?
Not always. Pi supports subscription login for some providers and API-key authentication for others. Run /login inside Pi to manage authentication.
How do I use OpenAI with Pi Coding Agent?
You can set an OpenAI API key before launching Pi:
export OPENAI_API_KEY=sk-...
pi
You can also use /login if you want to manage credentials from inside Pi.
How do I use Claude with Pi Coding Agent?
You can use Claude through subscription authentication or an Anthropic API key, depending on your setup.
For an API key:
export ANTHROPIC_API_KEY=sk-ant-...
pi
Inside Pi, you can also run:
/loginWhere does Pi save sessions?
By default, Pi saves sessions under:
~/.pi/agent/sessions/Sessions are organized by working directory.
How do I give Pi project-specific instructions?
Create an AGENTS.md file in your project and add project rules, commands, and preferences.
After editing it, restart Pi or run:
/reloadCan Pi edit files and run commands?
Yes. By default, Pi can read files, write files, edit files, and run shell commands in the current working directory. Use git checkpoints and review changes carefully.
Final Thoughts
Pi Coding Agent is a practical choice for developers who want an open-source, terminal-first AI coding agent. The setup process is straightforward: install the npm package, start Pi inside a project, authenticate with a provider, and begin with a safe repository-level request.
For beginners, the best workflow is simple:
Ask Pi to understand the project.
Add clear project instructions with
AGENTS.md.Use file references for focused tasks.
Ask for small, reviewable changes.
Run checks before accepting edits.
Used carefully, Pi can become a practical terminal-based assistant for repository exploration, code review, small edits, debugging, and running project checks.